Assess the substrate
The surface should be sound, dry and clean, free from dust, loose material, oil and residues that may reduce adhesion.
CONCRETTA · APPLICATION GUIDE
The right preparation, layer sequence and application method matter as much as the surface itself. Here is a clear overview of the core workflows.
APPLICATION PRINCIPLE
Each product family has its own layer build-up and application requirements. Substrate stability, moisture, cleanliness, compatible auxiliary products and site conditions all directly affect the final result.
Important: This page explains the general workflow. Always use the current technical documentation for exact mixing ratios, consumption, drying times, primer, adhesive and protective-finish selection.
01 · SEAMLESS SURFACES
Layer build-ups vary by product, but sound preparation, homogeneous mixing, controlled application and the correct protective finish remain the core principles.
The surface should be sound, dry and clean, free from dust, loose material, oil and residues that may reduce adhesion.
Cracks, voids and irregularities are corrected with a suitable method. Primer selection depends on the substrate and the system being applied.
Use clean containers and tools, follow the current technical sheet for product-to-water ratios and add liquid gradually to achieve a homogeneous mix.
Once mixed, apply in a controlled manner with clean trowels and tools. Intercoat timing and surface treatment continue according to the product system.
Use the appropriate sealer or final protection system for the intended use and respect curing times before putting the surface into service.
02 · ARCHITECTURAL PANEL
The primary installation approach is adhesive bonding; mechanical reinforcement can be added depending on the substrate, panel size and project detail.
Check panel sizes, starting axes, joints and corner details with a dry layout before installation begins.
The wall or substrate should be flat, stable, clean and compatible with the adhesive. Level or prime where required.
Use an adhesive suitable for the project and substrate, creating adequate contact behind the panel and checking alignment as work proceeds.
For façades, high-level work or project-specific conditions, screws or another appropriate mechanical fixing detail may be added following technical assessment.
Corners, junctions and joints are completed according to the finish detail of the product family, followed by controlled surface cleaning.
03 · DECORATIVE WALL PANELS
Across concrete, brick, stone and wood character panels, clean setting-out, the right adhesive and disciplined finishing are essential to visual continuity.
Plan texture repetition, panel direction and cut locations before fixing. With natural-looking textures, review the composition before installation.
Make sure the surface is dry, clean, stable and load-bearing, removing loose coatings or materials that could reduce adhesion.
Place the panel using a suitable adhesive and check alignment. Adhesive selection should match both the panel type and the substrate.
Add mechanical reinforcement where required by the project. Screw heads and junctions are concealed or completed according to the system detail.
Check texture continuity, corners, joints and cleanliness together, completing colour or touch-up work where necessary.
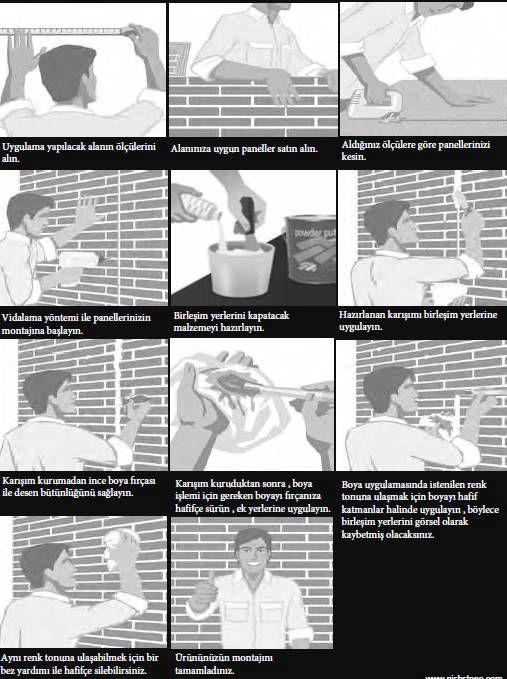
Dry layout, cut locations and substrate preparation should be planned together before panel installation begins.
BEFORE YOU START
Site conditions and substrate preparation determine many application issues before the material is even opened.
Is it sound, dry, clean and stable?
Are primer, adhesive and protective finish correct?
Are mixing, trowelling and cutting tools ready?
Are temperature, humidity and curing conditions suitable?
Have colour, texture and finish been approved?